
| 일 | 월 | 화 | 수 | 목 | 금 | 토 |
|---|---|---|---|---|---|---|
| 1 | 2 | 3 | 4 | 5 | 6 | 7 |
| 8 | 9 | 10 | 11 | 12 | 13 | 14 |
| 15 | 16 | 17 | 18 | 19 | 20 | 21 |
| 22 | 23 | 24 | 25 | 26 | 27 | 28 |
| 29 | 30 | 31 |
- jsx반복문
- includes()
- useEffect()
- 소수점 올림내림
- repeat()
- sort()
- 차집합
- new Date()
- Eventlitener
- getday()
- toUpperCase()
- filter()
- parseInt()
- slice()
- Math.floor()
- 교집합
- Number()
- setDate
- map()
- 항해99솔직후기 #항해99장점 #항해99단점 #부트캠프추천
- useRef()
- useState()
- reat if문
- substring()
- 3진수
- React
- indexOf()
- Math.sqrt()
- isNaN()
- charAt()
- Today
- Total
개발자로 전향중
Nextjs14 + jest + msw 도입기 본문
이전에 만들었던 서비스는 기능 테스트가 없었음
서비스의 규모가 점점 커짐에 따라 테스트 기능의 필요성을 느꼈고 새로 시작된 프로젝트에서는 테스트의 필요성을 느꼈다. 그러나 유닛 테스트를 하나하나 하기에는 불필요하다 느꼈고 BDD 방법론을 따라 사용자 중심의 통합 테스트를 진행하기로 함.
우선 jest 및 react-testing-library 설치!
https://nextjs.org/docs/app/building-your-application/testing/jest
Testing: Jest | Next.js
Learn how to set up Jest with Next.js for Unit Testing and Snapshot Testing.
nextjs.org
공식문서에 잘 나와있으므로 설치하고 yarn test 실행하여 잘되면 설치 완료!
Tip: 뭔말인지 잘모르겠으면 Quickstart로 레포지토리를 생성하고 설정 파일과 package.json 의존성 패키지만 가져오면 된다.

다음은 msw 설치!
https://www.npmjs.com/package/msw
msw
Seamless REST/GraphQL API mocking library for browser and Node.js.. Latest version: 2.6.0, last published: 3 days ago. Start using msw in your project by running `npm i msw`. There are 343 other projects in the npm registry using msw.
www.npmjs.com
Nextjs는 ssr을 지원하기 때문에 mocking할 때 server와 client 설정을 분리해야된다. 하지만 이건 test가 아닌 페이지에서 api를 모킹해야 될때고 테스트용도라면 client는 필요없다. nodejs 환경이기 때문에! 여러 블로그 등을 찾아보다보니 혼동이 생겨서 주의!
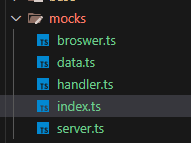
server.ts
import { setupServer } from 'msw/node'
import { handlers } from './handler'

export const server = setupServer(...handlers)
handler.ts
// src/shared/api/mocks/handler.ts
import { http, HttpResponse } from 'msw'
import { MOCKDATA } from './data'

export const handlers = [
  http.get('https://examples.com/meta/room-info/all', () => {
    return HttpResponse.json(MOCKDATA)
  }),
]
data.ts
export const MOCKDATA = {
  success: true,
  worlds: [
    {
      id: '1',
      hostId: 'host123',
      mapType: 'Plaza',
      title: 'Virtual Plaza',
      desc: 'A beautiful virtual plaza for social gatherings.',
      customObjectInfos: [],
    },
    {
      id: '2',
      hostId: 'host456',
      mapType: 'Meeting',
      title: 'Meeting Room A',
      desc: 'Private meeting room for teams.',
      customObjectInfos: [],
    },
  ],
}
앞에서 말했듯 broswer과 index는 test가 아닌 브라우저에서 사용할 때 필요함!
이제 부터 중요!!
nextjs에서 msw를 사용할 때 따로 해주어야할 설정이 있다! jest 2.xx 버전을 사용할 경우
const nextJest = require('next/jest')
const createJestConfig = nextJest({
// Provide the path to your Next.js app to load next.config.js and .env files in your test environment
dir: './',
})
// Add any custom config to be passed to Jest
const customJestConfig = {
setupFilesAfterEnv: ['<rootDir>/jest.setup.js'],
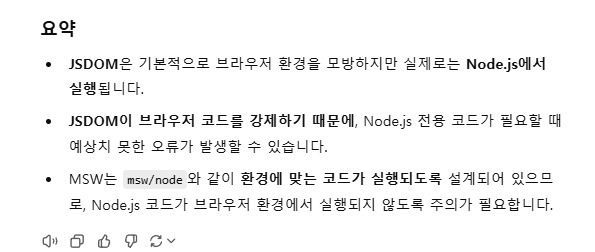
testEnvironment: 'jest-fixed-jsdom', //ReferenceError: TextEncoder is not defined
testEnvironmentOptions: {
customExportConditions: [''],
}, //Cannot find module ‘msw/node’ (JSDOM)
}
// createJestConfig is exported this way to ensure that next/jest can load the Next.js config which is async
module.exports = createJestConfig(customJestConfig)npm jest-fixed-jsdom 설치 후 수정
또한 cannot find module 'msw/nodw'가 나올 경우 testEnviromentOptions 추가 해주면 된다. 이유는 아래와 같다.
그럼 설정은 끝났다.
import { render, screen } from '@testing-library/react'
import '@testing-library/jest-dom'
import { server } from 'shared/api/mocks/server'
import { WorldPreview } from 'entities/world/world-preview'
import { WorldDetails } from 'shared/api/world'
import userEvent from '@testing-library/user-event'

import mockRouter from 'next-router-mock'
import { MemoryRouterProvider } from 'next-router-mock/MemoryRouterProvider'

jest.mock('next/router', () => jest.requireActual('next-router-mock'))

describe('HomePage Component', () => {
  beforeAll(() => server.listen())
  afterEach(() => server.resetHandlers())
  afterAll(() => server.close())

  it('월드리스트 보여주고 클릭시 해당 페이지 라우팅', async () => {
    // `Home` 컴포넌트 렌더링
    const response = await fetch('https://examples.com/meta/room-info/all')
    const data = await response.json()

    render(
      <div>
        {data.worlds.map((world: WorldDetails) => (
          <WorldPreview key={world.id} world={world} />
        ))}
      </div>,
      { wrapper: MemoryRouterProvider },
    )

    expect(screen.getByText('Virtual Plaza')).toBeInTheDocument()
    expect(screen.getByText('Meeting Room A')).toBeInTheDocument()

    // `data-testid`를 가진 링크 요소를 찾기
    const linkElement = screen.getByTestId(`world-${data.worlds[0].id}`)

    // 링크 클릭
    await userEvent.click(linkElement)

    // 클릭 시 페이지 라우팅
    expect(mockRouter.asPath).toEqual(
      `/world/${data.worlds[0].id}?mapType=${data.worlds[0].mapType}`,
    )
  })
})

아래처럼 처음 페이지 진입시 모킹 데이터를 통해 원하는 텍스트가 있는지 확인하고 next-router-mock을 설치하여 링크 클릭시 원하는 링크로 진입하는 것까지 확인했다. 생각보다 삽질을 많이했지만 앞으로는 안정성있는 서비스를 위해 통합테스트를 실행해야겠다..
***번외 if 서버컴포넌트에서 데이터를 모킹하고 싶다면?
nextjs에서는 다음과 같은 설정을 해야된다.
1. root 부분에 instrumentation.ts 파일을 만들고 해당 코드 입력
//test가 아닌 page에서 모킹할 때
export async function register() {
  if (process.env.NEXT_RUNTIME === 'nodejs') {
    const { server } = await import('shared/api/mocks/server')
    server.listen({ onUnhandledRequest: 'bypass' })
  }
}
2. next.config.mjs에 아래와 같이 설정

3. 서비스 워커 설치
npx msw init public/ --save
실행결과로 데이터가 잘들어온다.


'Nextjs' 카테고리의 다른 글
| export const dynamic = 'force-dynamic' 란? (0) | 2024.07.04 |
|---|